About
Leveraging AI to transform designs into working products with minimal development effort is shaping the future for those who understand both design and technology. For my brand’s website, I aimed to convert the application side into a Content Management System as quickly as possible using AI so it made updating content easier. This approach saved me hours of writing technical functions, allowing me to focus on more strategic tasks. While AI has been valuable in bridging the gap from design to code, it’s only a partial reliable partner in the process.
Impact
- I saved 70% of manual coding and thinking
- I saved 75% of development time, efforts and cost
- Better structure of the foundation in the code
- I learned a ton about the limits and capabilities of AI
Technology Stack
- Figma for Designs
- Visual Code to write code
- HTML
- SCSS/CSS
- Javascription
- Bootstrap 5 at the SCSS source
- WordPress as my Content Management System
- Chat GPT for code suggestions
How I started?
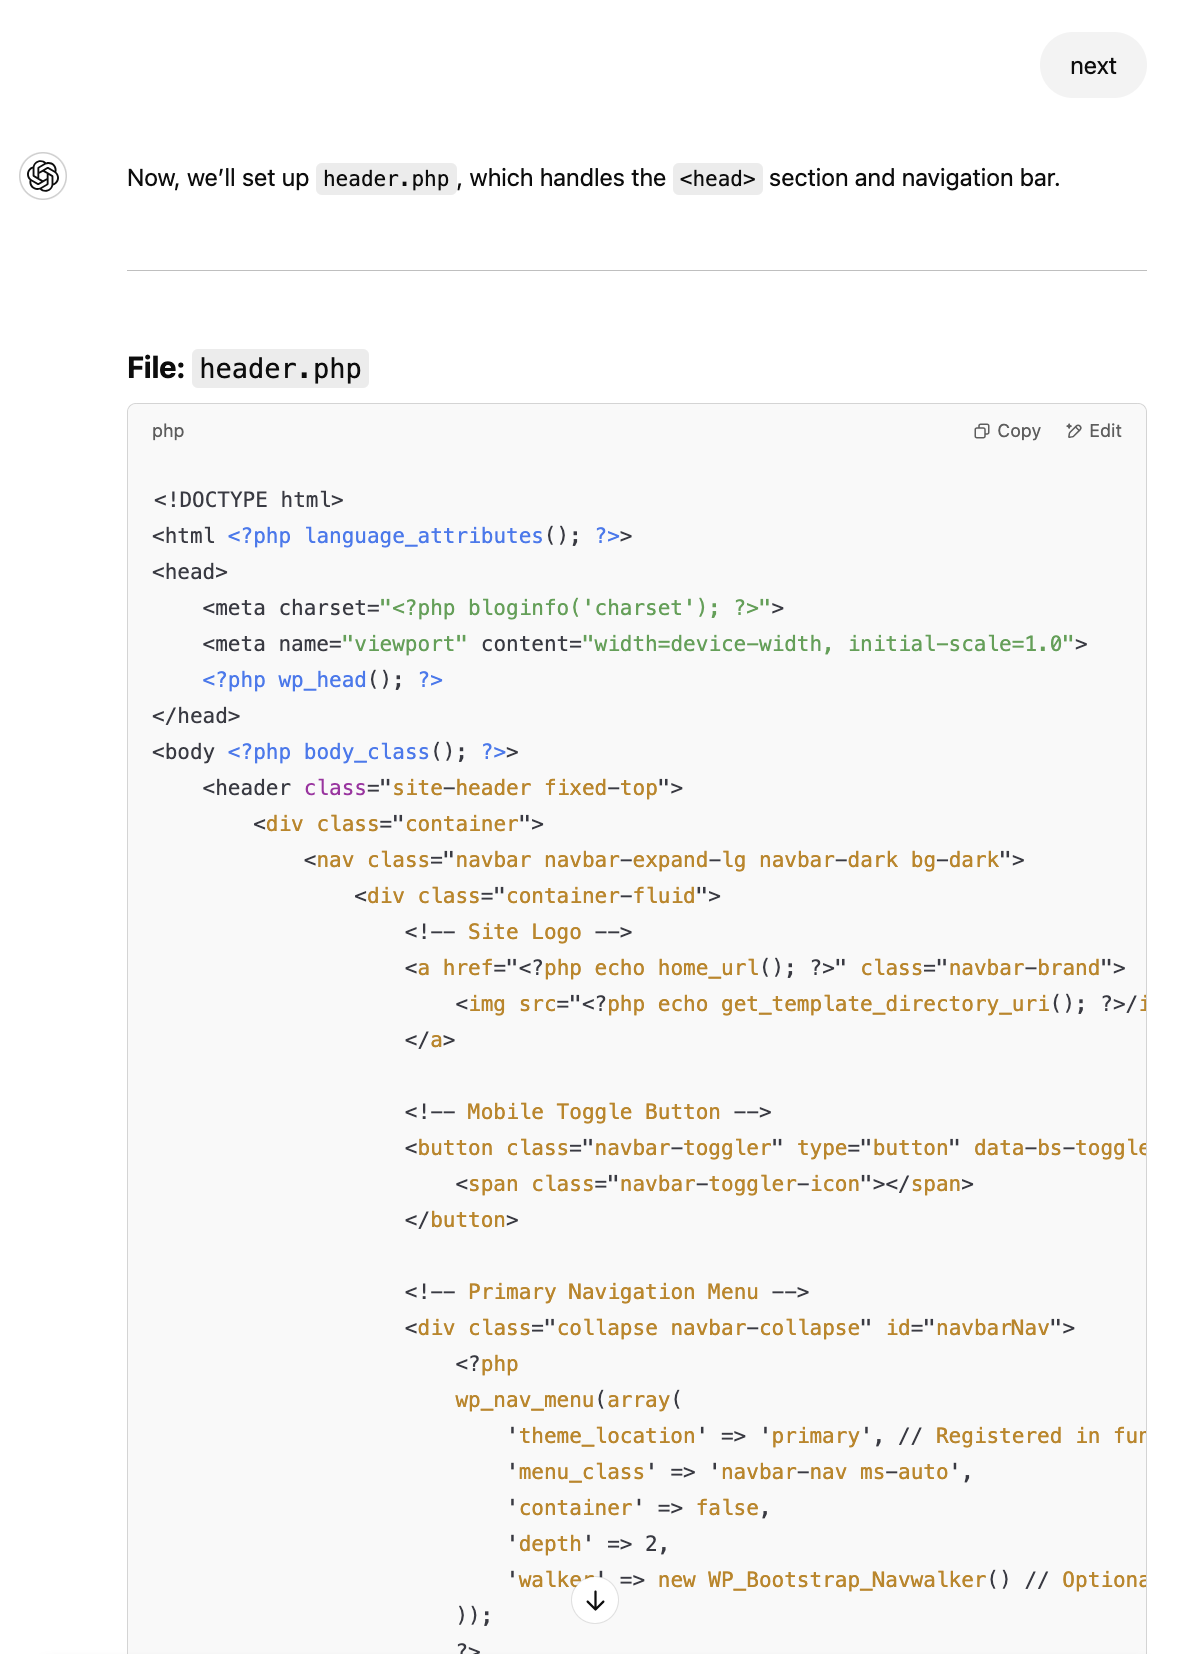
I typically build out the HTML first, ensuring it meets both visual and structural WCAG AA compliance. I prioritize clean, accessible HTML that aligns with what browsers expect. Using Bootstrap’s code structure speeds up the process since it provides ready-to-use snippets that can be easily customized. What I appreciate most is how Bootstrap encourages a consistent structure, helping ensure the HTML adheres to WCAG standards—something browsers inherently prefer. This is a preview of just the header part of the website which we will diver into further

Architecture and Strategy
This phase serves as the skeleton and backbone of the process, providing the best foundation for structuring and mapping out the system. It helps us determine which components are needed, what should be dynamic, and what should be editable by the user. I wanted to see how much it can pick up on its own so I fed it the index.html file to see if it can recognize the components needed which essentially are the ‘<section></section>’ I had defined in the HTML which are the headers part of the page as seen in the YNOdesigns.com Sections screenshot

Here’s what it picked up initially.

This is the first iteration of the file structure, and it did a great job aligning with WordPress’s approach of breaking elements into separate files—header, body, and footer as individual components. Each of these can further be broken down into subcomponents which you can see in template-parts, making the structure more modular and manageable.

The changes I requested to make this file structure more of a generic theme included renaming ‘services’ to ‘checklist’ and ‘successes’ to ‘case studies’, which it handled correctly. I also knew I wouldn’t be using a sidebar, so I asked it to remove that. My goal was to eliminate unnecessary code, keeping only what’s essential for a clean and efficient structure.

Let's start coding
It started generating unnecessary CSS code on its own, and I was like, hold up—this thing is pretty stupid! for not recognizing that I had already referenced the bootstrap.min.css file in index.html. I gave it some grace and clarified that all styling should come from Bootstrap.

Setting up dynamic functions
Functions define the rules for how components behave—what information users can enter, what they see, and how content is displayed for the end consumer. It did a good job setting up the basics while remembering that I’m using Bootstrap. This is also where you specify the locations of CSS and JavaScript files, ensuring they load correctly within the <head></head> and <footer></footer> sections of the code.

I had to catch it slipping again because it forgot to include AOS, the CSS/JS animation library I’m using. At least it knows when to apologize, so there’s that.

Setting up dynamic navigation menu
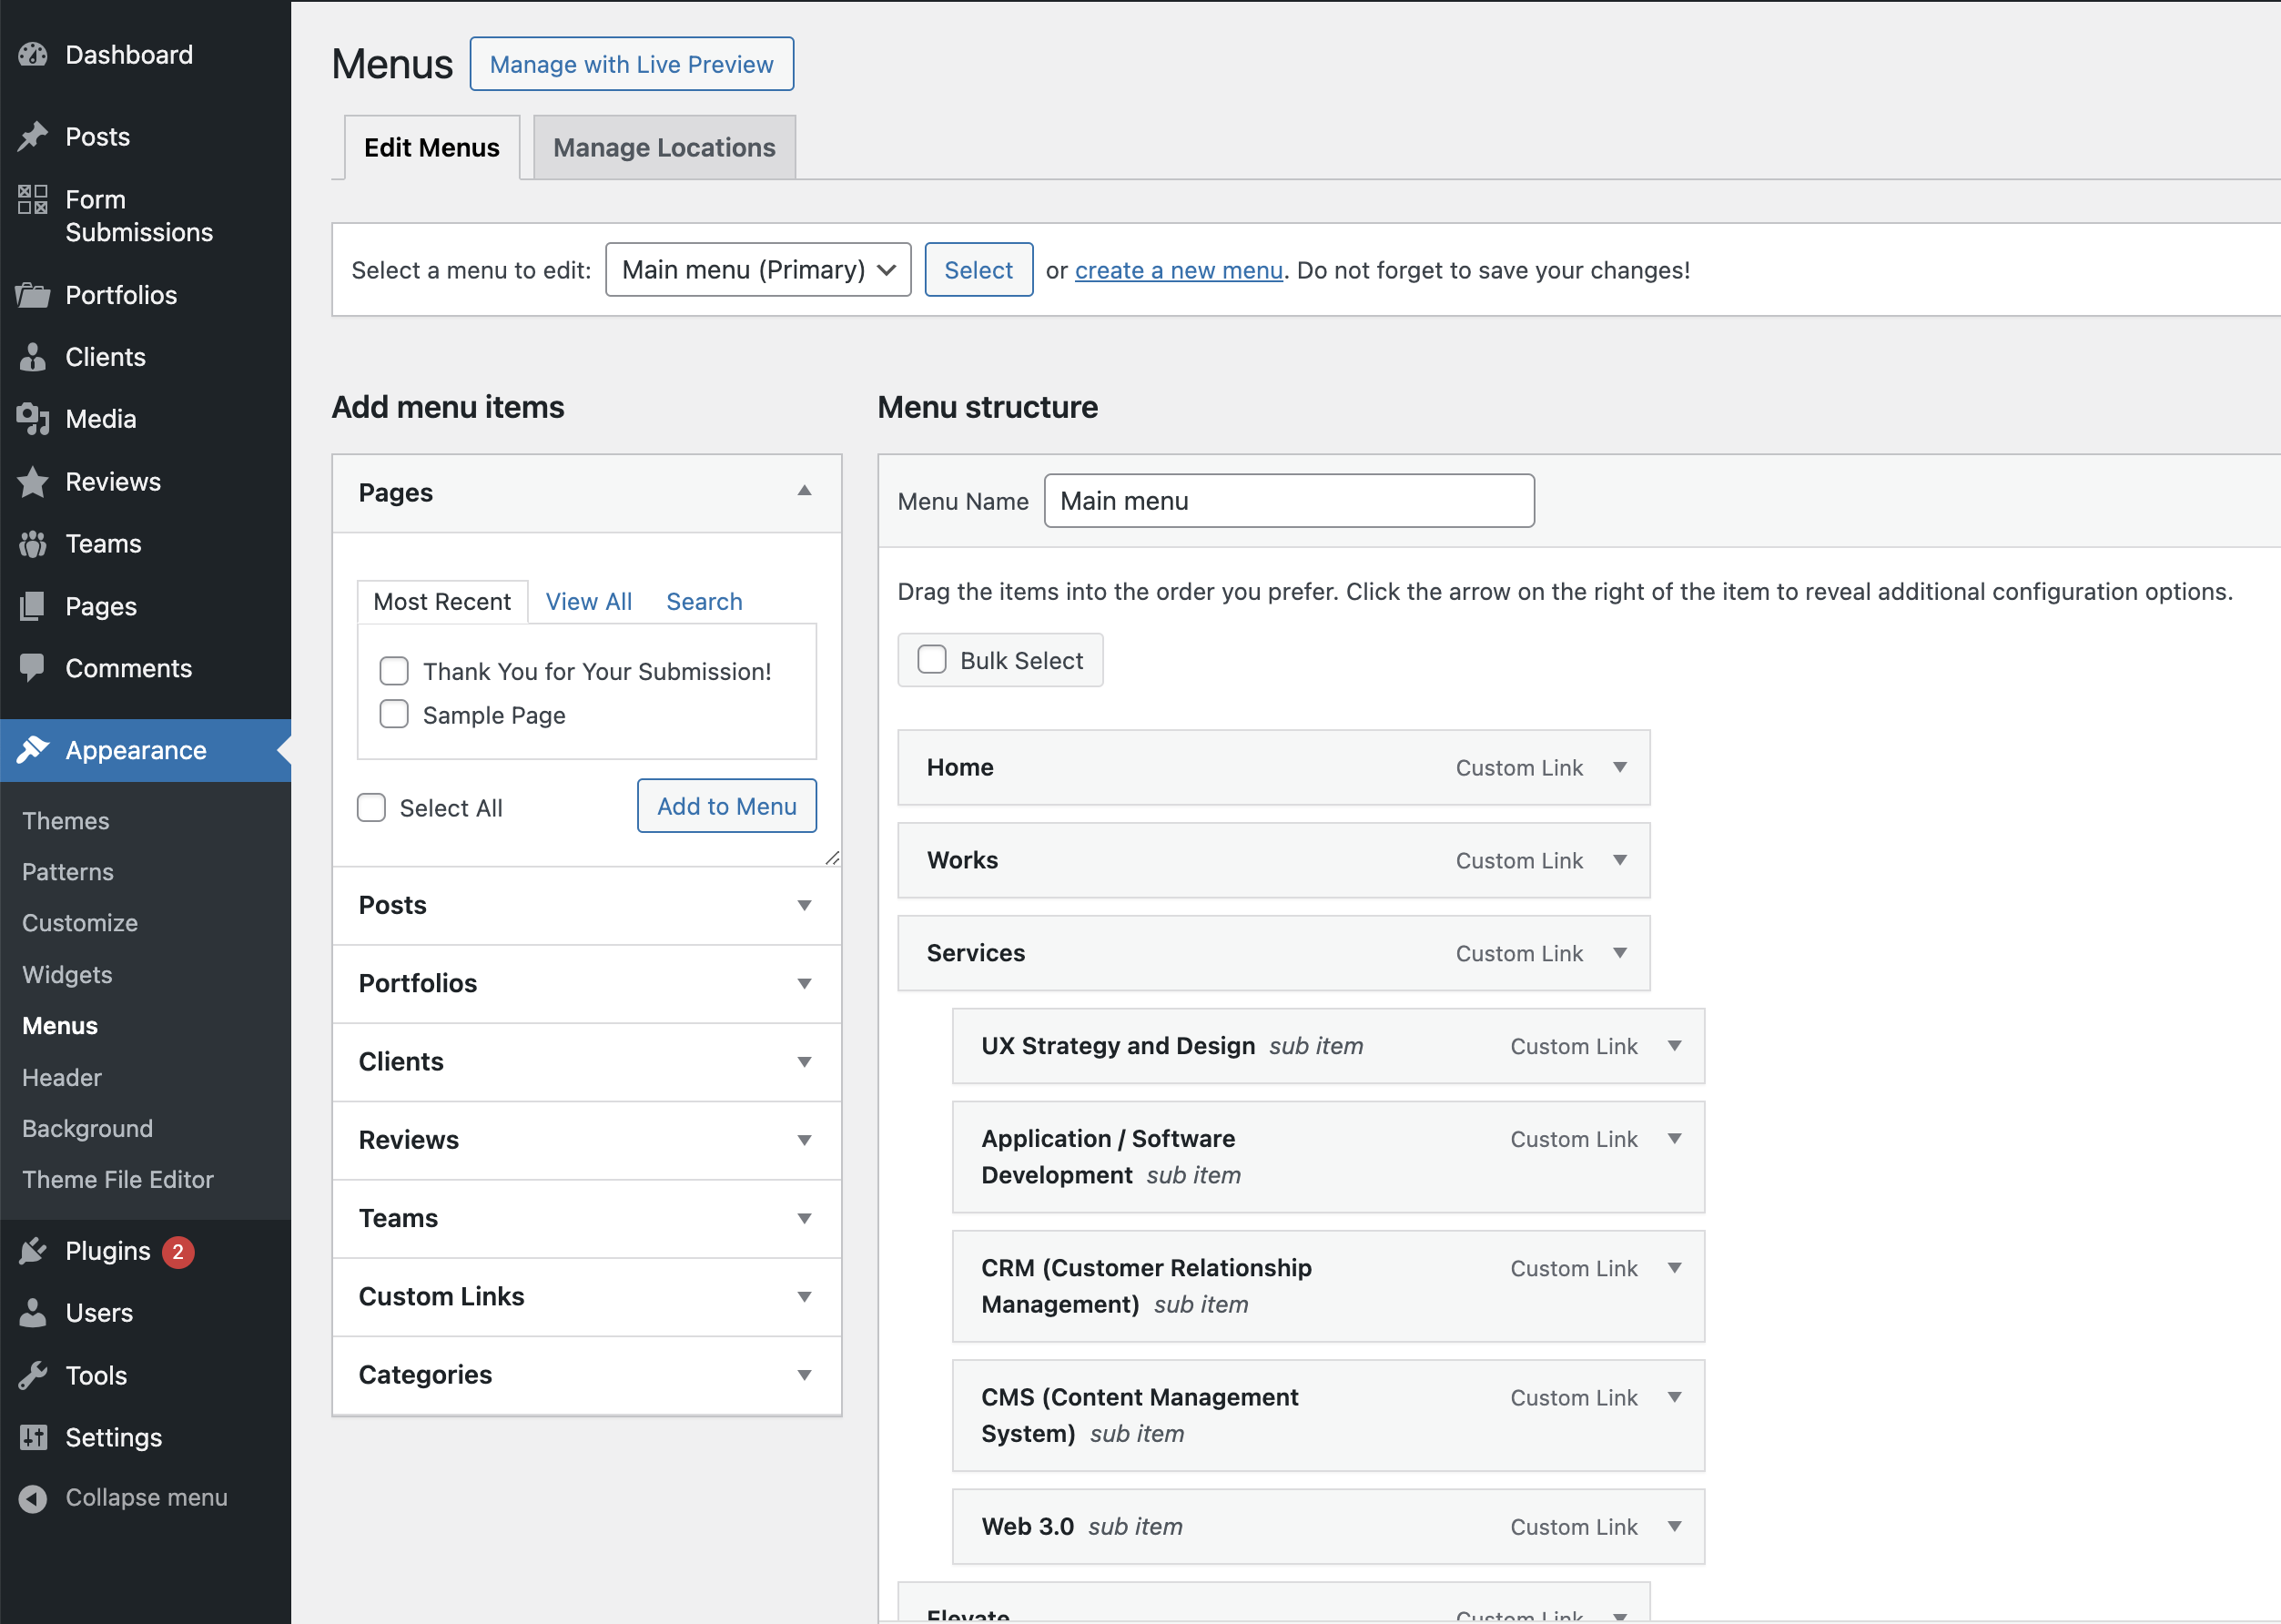
After setting up the basic functions, we work top-down on the page structure, starting with navigation. The header file contains the dynamic HTML structure we define, while the WordPress admin area provides a user-friendly interface for adding menu items.
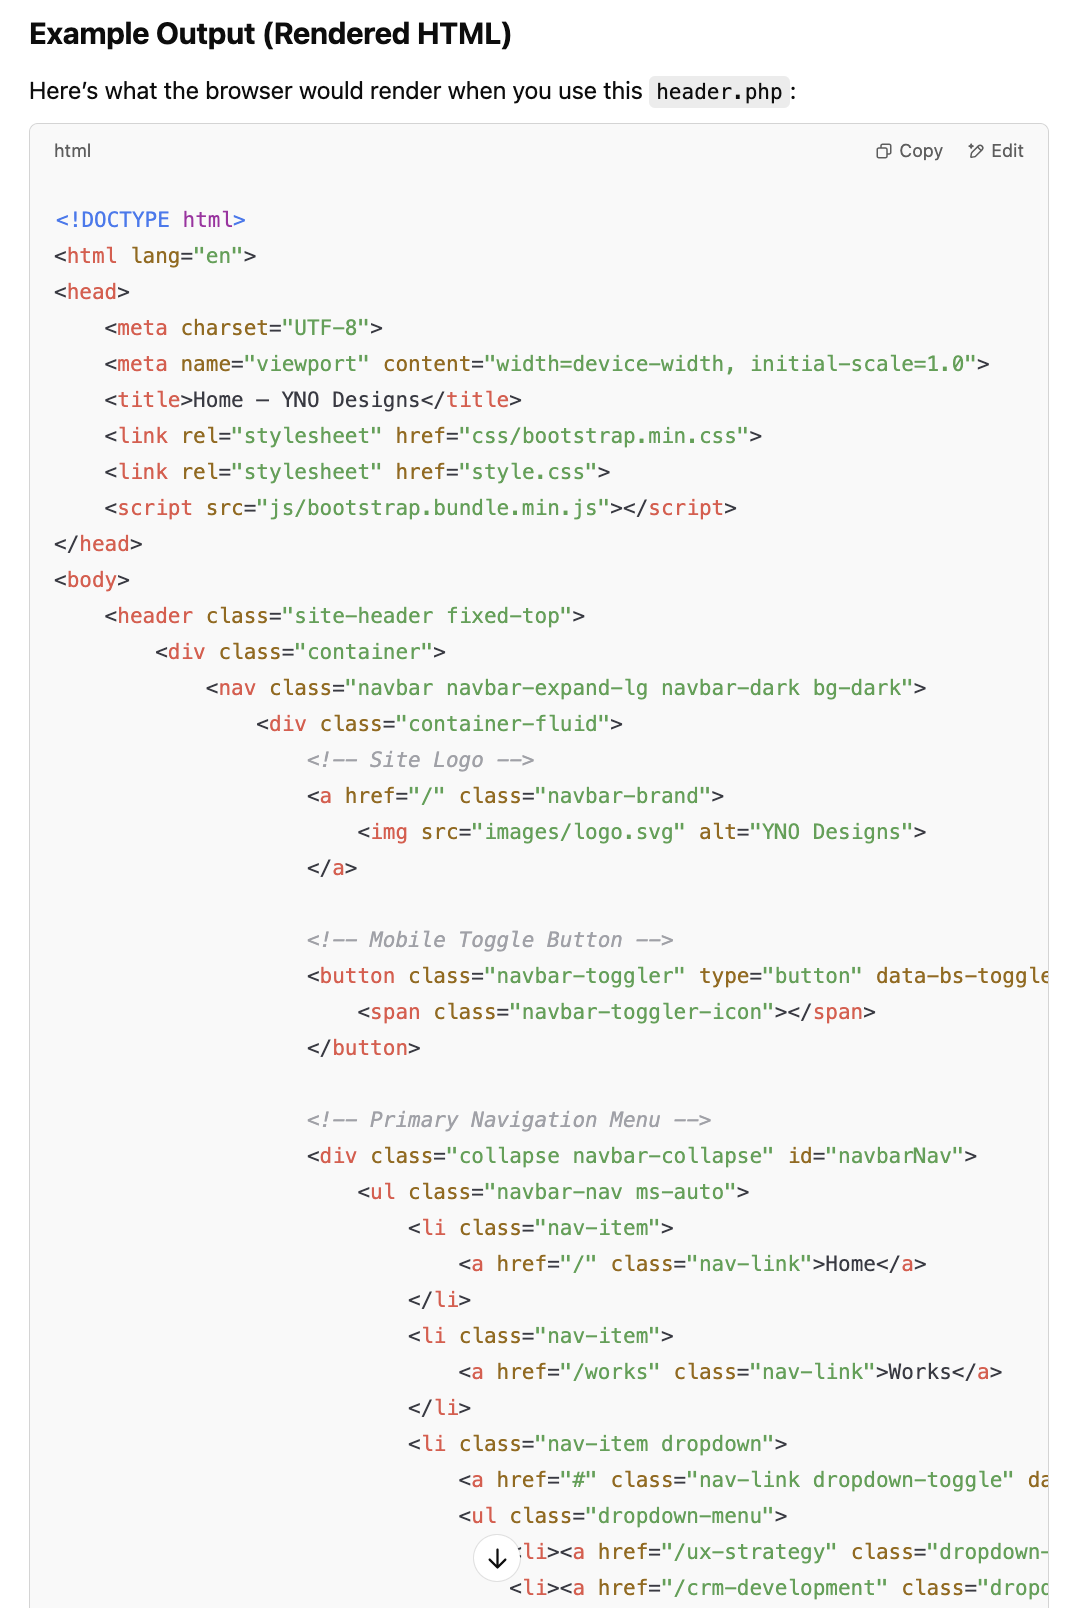
I had to tweak it using WordPress Navwalker for <li></li> structure and the classes inside it slightly, but it was about 85% correct from what it generated. Once I fixed this, I asked it to output the code in plain HTML so I could do a better human comparison against my original HTML code.
This is what the admin area looks like for setting up the menu.
Our case studies on the home page
Since we want to display a preview of some case studies on the homepage, we first need to break down their key elements: title, image, description, and a link. While this may seem straightforward, the architecture is more detailed, as each case study page will contain additional information. However, these four pieces of metadata are all we need to get started—and WordPress conveniently sets them up by default. This is done using custom post types in WordPress, which we’re calling “case studies” and setting up in the functions file.

Users can enter this information easily within the admin area. The title corresponds to the post title, the image is the featured image, the description we can use for the actual page but it’s the excerpt is what we will be using to display on the home page for each case study, and the link is automatically generated when we create the case study post.

Outcome
For the rest of the project, I was mindful of my time, so I brought in a long-time developer to take over since the architecture was already well-defined. This approach saved us significant time and cost—what would typically require two developers over a month, he was able to complete 80% of the necessary CMS functionality in just two weeks leveraging AI and existing patterns implemented. This included custom post types for team, reviews, and clients. We’re now enhancing the admin area to improve scalability for different post types and integrating SEO optimization capabilities.

Other Projects
Tidy App
Hospitality Mobile App
Research • Strategy • UI • UX Design
Increased user monthly signups by 262% within 6 months by redesigning the onboarding experience of an app to book cleaning service+262% increase in monthly signups in just 6 monthsSan Agency Center
Healthcare Web App
Research • Strategy • UI • UX Design
Streamlined Home Health agencies operations to manage their staff, field nurses, patients and insurance providers designing a new all in one SaaS platform+70% time saved per session for patient intake